Wednesday 27 November 2013

How to make a Velvet Scarf

We have been making these blogs for a few years now, and one thing I'm always surprised at is the timing. This will be the fourth time someone has asked me how to make something in our shop just as I'm about to pop a tutorial on the subject on-line.

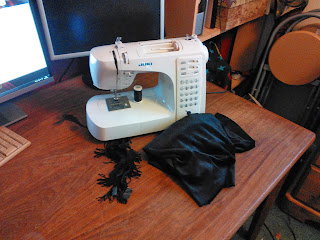
This sewing project was born through necessity. I lost my favourite velvet scarf and had no intention of paying £25 for a replacement.  I took a good look at a scarf in a shop and decided I could make it for around £5.

I decided my new scarf would be velvet to replace the one I lost. I was never a fan of the long tassels at each end of the scarf but found scarves without a decorative edge seemed a little unfinished. One perk of sewing your own clothes is that you don't have to make compromises.  I decided to use a short fringe so that the scarf will still look sophisticated., but not get tangled up.

You will need:

Half a metre of Velvet (150cm Wide)
Half a metre of fringe
Matching sewing thread
Sewing Needle
Pins
Thread snips.

Version one.

Step one. Marking out.
Take your half metre of velvet and fold it in half, so you have a rectangle 150cm by 25 cm.

Mark where the fold of the fabric is, and then unfold it, so you have a mark half way on the short side of the fabric.


Step two. Adding the fringing. The fringing is held on a strip of braid. We will want the fringing visible but not this braid.


 Pin the fringing along the short edge, going from the edge of the fabric to the middle point we just marked.,

The braid of the fringe should be along the edge of the fabric and the fringing pointing down the fabric.

Stitch the fringing to the velvet along the braided edge. Repeat on the other short edge.


Step Three. Sewing up. Fold the fabric in half along the long edge, right sides together.  Pin and sew with a seam allowance just wider than the width of  the braid that holds the fringe.  Make sure to leave a small gap on the long edge around 10cm long.


Pop your hand through the gap and pull the scarf right side out. Press with an iron and slip stitch the gap shut. (Or just use wunder web).

And Hey Presto you have a fabulous scarf to cut a dash in (or to give as a gift) for around five pounds.


Version 2
The above scarf has three sides sewn. It is just as easy to make a scarf out of two narrow strips of fabric of around 150cm by 28cm. Whilst this means you have an extra seam to sew you have the opportunity to use two different colours of velvet, or to add ribbon to one side of the scarf.

The only difference to the above method is you don't have to find the half way mark on the short end. Simple pin the fringe across all of the short end, you can also top stitch ribbon along the width as well.

Then just sew the two strips of velvet together, right sides together again leaving a gap for turning through.

There you have it, two ways of making a simple but sophisticated scarf. These scarves were an experiment in that I used a velour with a stretch. I was concerned that this would make the scarf shapeless, but I've found it works fine.
Friday 15 November 2013

How to knit tinsel for Christmas.

When you think of making Christmas decorations you may recall struggling with glue paper and card.
However you can make fantastic decorations with sewing and knitting. We've shown you how to make an advent calendar, a Christmas bauble and how to use ribbon and cinnamon for a simple decoration. To knit  this tinsel we are going to knit a scarf almost, of 5 stitches in width. But with a little twist. I must stress I'm very new to knitting, and I suffer from "sausage fingers" and even I managed this project!

Now our wonderful COO has shown me how to make tinsel by knitting! you will need:
Can Can knitting yarn.
Double Knitting Pins. 4mm

Can Can yarn comes in a ball like other yarns, at first glance it looks like a thick cord.


However when you tease it open you find it's more of a ribbon of mesh.


Casting On
Casting on with Can Can is simple.
Just slide one needle through the yarn on one side.


 3 cm along the yarn slide the needle through the yarn again. DO this until you have the needle through the yarn five times. That's it, we've cast on, see, simple!

 The Knitting. 
Slide the second needle UNDER the first THROUGH the loop it's made in the yarn.


 Loop the yarn around the front of the first needle.
Slide the second needle through the yarn about 3cm along from the first loop in the first needle.
Slide the second needle around  to the right and poke the needle through the loop on the first needle again.


 Just like this. Slide this new loop off the first needle, it should now be on the second needle. Repeat this for all five stitches.


 Rotate the second needle and then wrap the yarn around the front. Then slide the first needle under under the second (which now has the stitches on) and knit as you did before.  And that's all there is to it.


 Keep up this process until you run out of yarn and you should have a beautiful length of tinsel, or indeed a scarf.


 These lengths of tinsel look beautiful in any colour, and make fantastic boa style scarves for the new year.


You can also knit up multiple lengths and twist them together for this beautiful candy cane effect.


Finally we have a video where I attempt to knit on film! As I've said before I'm VERY new to knitting but even I have managed this project!

Wednesday 13 November 2013

OCD Sewing and Working

Or "The Japanese Tea Ceremony a warning from history".
OCD or Obsessive Compulsive Disorder is a strange condition. Much like schizophrenia and amnesia it is rarely fully understood by people. When I was growing up we thought schizophrenia meant you had two people in one head (in other words Multiple Personality Disorder), and amnesia was always a case of forgetting your past (whilst not knowing that Retro Grade amnesia, the inability to make new memories also exists)

Obsessiveness Compressive Disorder is often (but not always) a lot more than being a "Clean Freak". It isn't entirely about being trapped into performing rituals, however this is something I wanted to blog about today.

Legend has it that years ago a samurai had the PERFECT cup of tea in a tea house. The tea was at just the right temperature,  the bird song and crickets sounded just right, the lady serving the te
a moved in just the right elegant way. In short EVERYTHING just fell into place.  He wanted to recreate this feeling every time he had a cup of tea, and so the tea ceremony was born. His serving lady had to move in the same way, the tea had to be the same temperature and so on. However this will not always recreate the same moment of bliss as many things are beyond our control. The temperature and humidity of the tea house, the background noise, his thoughts from earlier in that day. By insisting so much remain unchanged he had stifled the universes ability for random chance to effect the end result, So from that moment on no cup of tea he had would be as good, and could never be as it had become a regimented  unchanging ritual.

I have no idea how factual accurate the above tale is, however I think it can still teach us something. Having everything "just so" when we work is fine to a point. A tidy work space, knowing where everything we want like our sewing tools are and so on can speed up sewing and make it more of pleasure.  My trouble is when I can't find "MY SEWING MUG" or can't decide on the best DVD to watch. Then I become distracted, my work suffers, assuming I ever get round to starting it instead of picking through DVD's or hunting an errant Tardis mug

I guess what I'm trying to say is it's great to be organised, and it's great to have things around us that make work a pleasure but be open to change, it will happen whether you like it or not one day. Mug's break, DVD's get damaged and then you'll have to work with a new mug, and maybe listening to the radio, and who knows you may find this even more enjoyable that your old routine.